Appearance
Supp update
The Supp update page consists of the following sections (or “panels”):
- VNSW info
- Contractor info
- Workflow info
- Supp info
- Land description
- Internal notes
- Related properties
- Legal descriptions
- Values rationale / exceptions
- Cancelled concessions
- Attributes
- Analyses & sales
- Attachments
- Attachment folders
- Worksheet calculations (main)
- Comparison properties
- Comparison sales
- Worksheet calculations (other)
- Worksheet notes
- Worksheet PDFs & snapshots
- Activities
- Leases
- Development applications
- S26A group detail
- S26A children
- Related group info
- Section 28 (land use)
- Section 28 (LGA apportionment)
These panels can be expanded, collapsed, and arranged on one or more tabs. You can save tab layouts, and instantly switch between multiple tab layouts.
The panel ordering is associated with your user, so even if you log on from a different computer, the panel ordering will be as you have set it elsewhere.
If you make changes to any of the fields or values and try to load a different page in the current tab without saving, the browser will ask you if this is what you really want to do. The same applies if you try to close the tab or the browser window without saving.
There are a few buttons at the top of the page that can be used to perform various actions to the supp.
- Save: You can press this to save whenever you make changes to the property.
- Check W/F: You can press this to run and show the workflow checks on the supp, showing the results in a dialog. The current supp will be highlighted, whilst other supps in the workflow will be displayed as usual.
- View import log: You can press this to see the import log messages for the data file that imported this supp.
- Check W/S: If a supp has worksheet values, you can press this button to run and show the worksheet integrity checks.
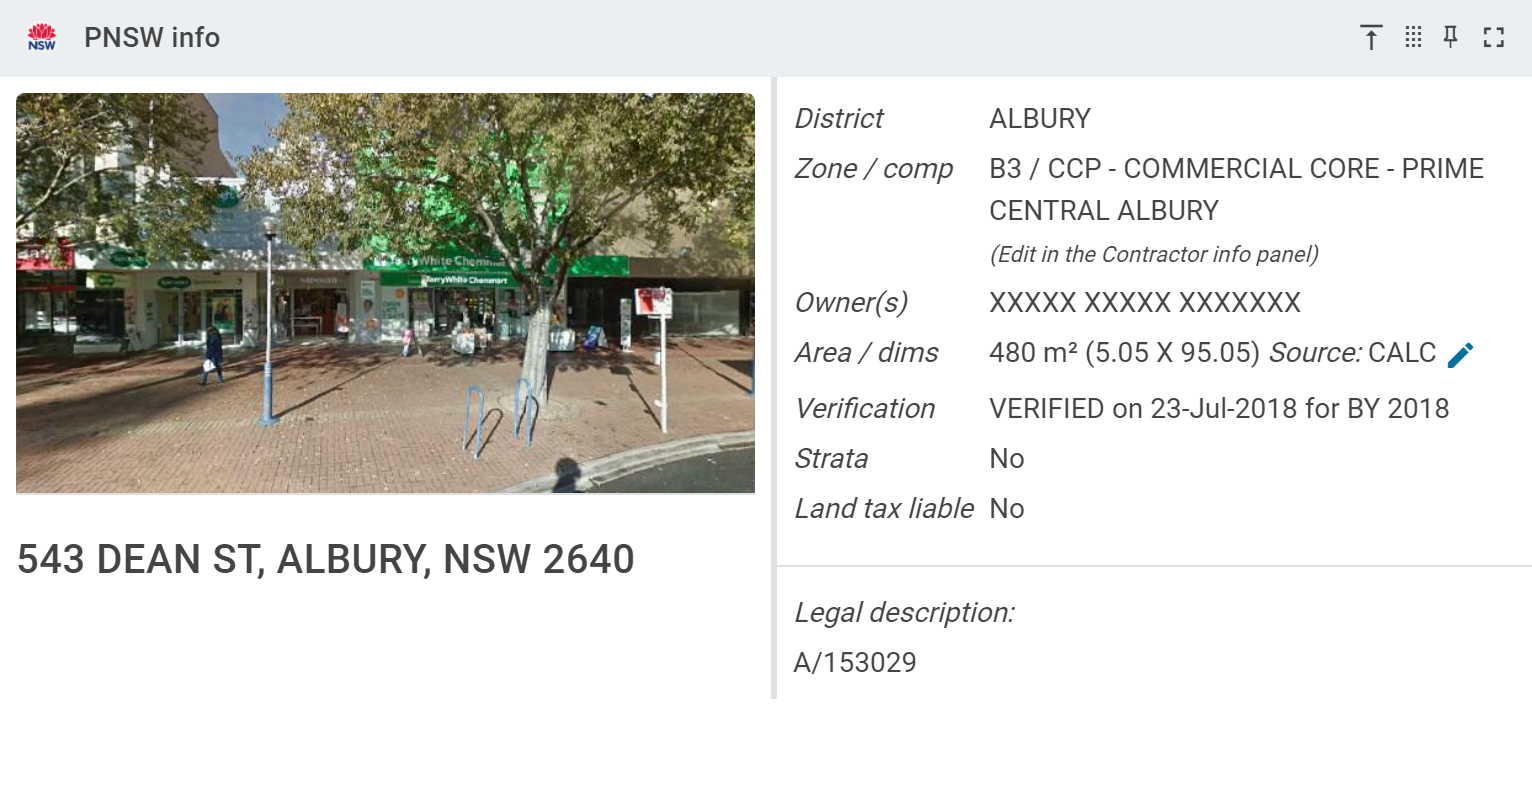
VNSW info
This panel displays information "owned" by the Valuer General of NSW. In general, this information will be updated by supp action provided by VNSW. However, you can update two of the items represented here. The zone and component can be updated from within the Contractor info panel (below), and administrators are able to update the area and dimensions by clicking the pencil next to the Area / dims section.
If you click the Edit  icon to update the area and dimensions, you'll see a popup like this:
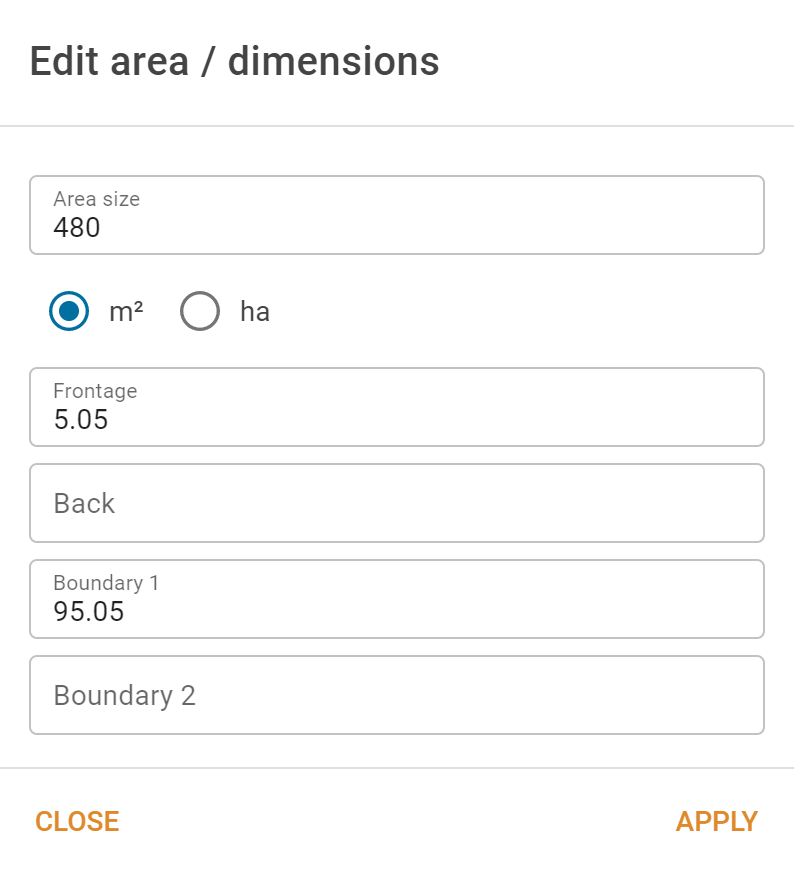
If you choose to update this information, the system will keep track of the fact, and you will be able to get a list of all area/dimension updates since a nominated date. The Reporting | Management reports | Properties with changed area report will give you this information. It is extremely important that you supply your changes to VNSW so that their records remain up to date.
Contractor info
The Contractor info panel contains property settings that are under your control and of interest to your business.
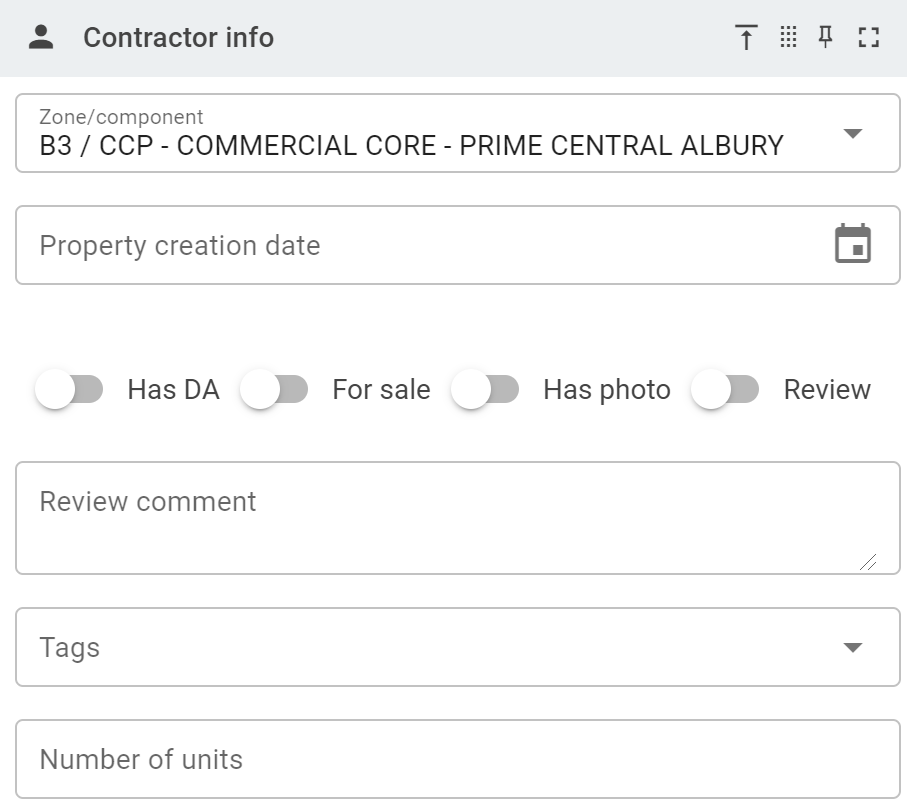
You determine the zone and component to which the property belongs. If you change the zone, the system will record the change, and you will eventually need to export this change log to VNSW in the form of a Component changes export on the Data transfer | Export data page.
The property creation date is generally set by VNSW, but in many cases this information isn't delivered. You can set and update this if you want, but if the value is already set, it's better to leave it.
You can switch on the Has DA flag, and search for properties that have this flag set. However, since the introduction of the Development applications panel, there are better ways of searching for this information.
Use the For sale flag to indicate that you know the property is for sale. You can search for properties with this flag set. If a property is flagged for sale and a sale comes in for the property, this will be noted in the import log. If you have the Contractor | Options | Sales | Clear the "For sale" flag on sale properties when importing sales flag set, the flag will be cleared when the sale is imported.
Use the Has photo flag to indicate that a property has photos attached. You can search for properties with this flag set.
Use the Review flag to indicate that a property should be reviewed for some reason. You may want to enter a Review comment as well. Properties that have the Review flag set will show up in the Annual values audit in the MVOW: review flags section.
You can also set tags for the property as defined by your organisation, and you can set the number of units on the property.
Workflow info
The panel displays information about the entire workflow, including when the supp is due for completion, any comments VNSW personnel have provided, and links to all other supps in the workflow.
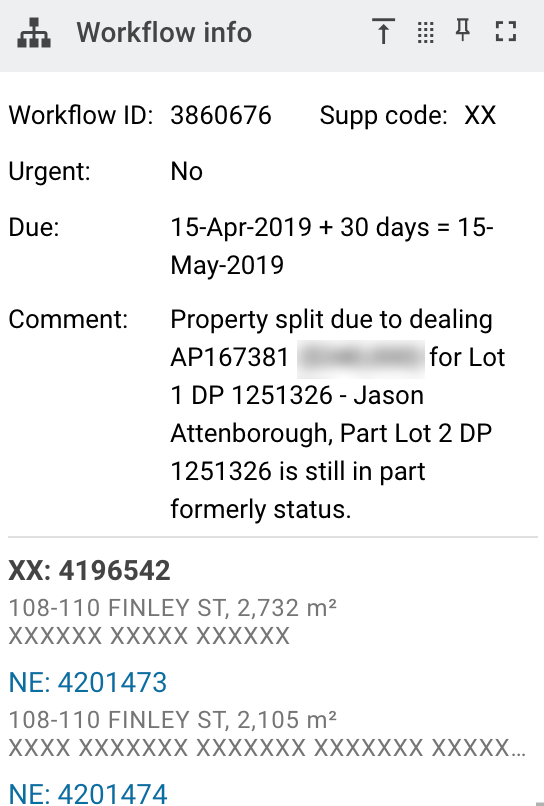
You can't edit any of the information in this panel.
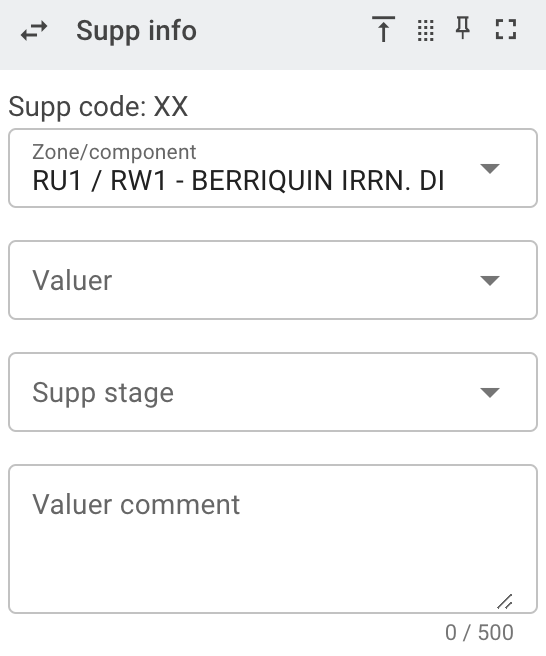
Supp info
This information concerns how you deal with the supp. You can set the component, assign the supp to a valuer, set the supervising valuer, and enter supp comments (thus bypassing the integrity checks and validation rules, and causing the supp to have to be processed manually). You can also choose a supp stage if your organisation uses them.
Valuer comments are special in that they affect the processing of a supp. In general, if you have a comment here, you can mark a supp as ready to send even when there are outstanding integrity check failures. Including a valuer comment will stop the supp from being processed automatically by VALNET and require a member of the VNSW data team to intervene. Having this in mind, it's inappropriate to add a valuer comment simply because the integrity checks are failing. It's better to correct the situation that's causing the failure.
Land description
The land description is entered using the Note editor. You can format the text using most regular styles. This formatting will be applied to the text when it is included in pages within MVOW, and when it is printed in PDF reports. Remember that any formatting will be stripped out if this text is sent to VNSW.
If the supp is a PE supp, the land description has an Import PX information button in the top right corner. If you click this button, the page will open a popup that contains the tags (if any), land description, internal notes, and any attachments and worksheet information from the associated PX supps. You can then elect to import these items into your PE supp.
Internal notes
The internal notes are entered using the Note editor. You can format the text using most regular styles. This formatting will be applied to the text if it is included in pages within MVOW, and if it is printed in PDF reports.
Legal descriptions
This panel lists the legal description associated with this property. the legal description includes lots, plan numbers, leases and lease numbers. You can't change any of these.
Values
Values are editable in place. There are a few automatically updating fields:
- If you enter a land value (LV) and the DVM is not set, the system will automatically set:
- the DVM to today’s date
- the valuation methodology of all years to VERIFIED
- the verification date of all years to today's date
- If you enter a risk rating (RRating) and the risk rating date (RDate) is not set, the system will automatically set the RDate to today’s date.
- If you enter a verification method and the verification date is not set, the system will automatically set the verification date to today’s date.
You will be able to enter values for the future year, current (LT) year and an LG year. If the LT year and the LG year are the same, then the prior LG year will be available until June 30.
There is an Import property values button that will import any available values from the property record. If this is a PE supp, there will no existing property values, so nothing will be imported. Note that after you click this button, you will still have to save the supp to make the changes permanent.
Cancelled concessions
When a sale for a property is imported, MVOW will automatically cancel the offsite, onsite and subdividers concessions. Where this has happened, this panel will list the concessions as they stood before the sale.
Attributes
If there are attributes associated with the component to which this property belongs, they will be in the list of attributes for the property, but lacking quantities (unless they’ve been set).
The attributes panel contains one tab for each year between the year attributes were first assigned to the property, and the future base year. On any year before the future year, there is a Copy to button that you can click to carry the attribute values forward to the next year; on the future year tab, the button is an Apply to button, and allows you to apply the calculated attribute value to the future year’s land value.
The attributes panel contains a tick box in the upper right-hand corner with the caption Balance areas. If you tick this box, the system will assume that all Qty values are areas, and will adjust the top line so that the total of all Qty values adds to the property's area. Values will be adjusted as you enter lines.
The new Value won't necessarily be the same as the LT LV because of rounding, but it will be close, and when you come to apply the value to the corrected LV, the rounding should clean things up.
Analyses & Sales
Sales contains a list of the property’s sales. You can click the Sale ID or the dealing to view the sale directly. Columns can be rearranged and user preferences will be retained.
Analyses lists the analyses that have been undertaken on this property. You can click the Analysis ID to view the analysis directly. Columns can be rearranged and user preferences will be retained.
Comparison properties
This is a list of properties that you’re using as comparisons to the property for which you’re generating the worksheet.
You can view all properties within the property’s component. You can select specific properties as points of comparison by placing the PID(s) on the clipboard and pressing the Paste PIDs button.
If you have templates set in Comparison templates, you can also select one of them in the Enter IDs dialog. The comparison text for the PIDs will then be generated according to the chosen template. When pasting PIDs, the default template for property comparisons will be used.
You can also view all comparable properties within MVOW mapping  , ValMap
  , or ValMap portal
  .
.
Comparison sales
This is a list of sales that you’re using as comparisons to the property for which you’re generating the worksheet.
By default, the comparison text is generated according to the Contractor | Options | Worksheets | Subject / analysis comparison type contractor option. When entering IDs, if this options is set to use templates, you can choose any available template to use for the generated comparison text.
There is also a sale comparison comment following the Comparison sales table. If you enter any text into this field, it will be displayed on the worksheet under the Comparison sales heading. If there are any comparison sales, the comment will follow the sales, but the comment will be displayed, regardless of whether or not there are any sales.
You can also view all comparable sales within MVOW mapping , ValMap , or ValMap portal .
The wording is such that you’re describing how the property you’ve just added compares to the subject property. If you say Inferior property, you’re saying that the subject property is superior to the one you’ve just added for comparison.
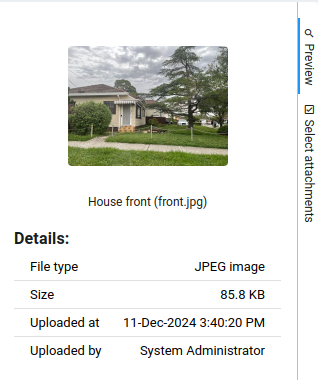
Attachments
The Attachments panel contains a list of all the attachments associated with the property. They are displayed in order of attachment date and time to start with, but if you rearrange them the order will be retained.
You can add attachments to this list by simply dragging and dropping them on to the page, or by clicking the Upload attachments button. Then click Add files… in the popup.
You can delete any attachments from the property by clicking the Remove  button. The system will ask you if you’re sure you want to do this, because deleting the attachment will remove it from any analyses, supps and/or worksheets.
If you try to delete an attachment that is also used in other properties, you will be given the opportunity to delete the attachment from all other properties. This is not the default behaviour, and you have to actively choose for this to happen. Deleting an attachment from a property actually unlinks it if the attachment is in use by another property. It's only when it's deleted from the last property that the attachment file is actually deleted from the server.
ANYTHING YOU DO WITH ITEMS IN THIS PANEL WILL BE RECORDED ON THE SERVER IMMEDIATELY.
You don’t have to click the Update button in order to have these changes become permanent.
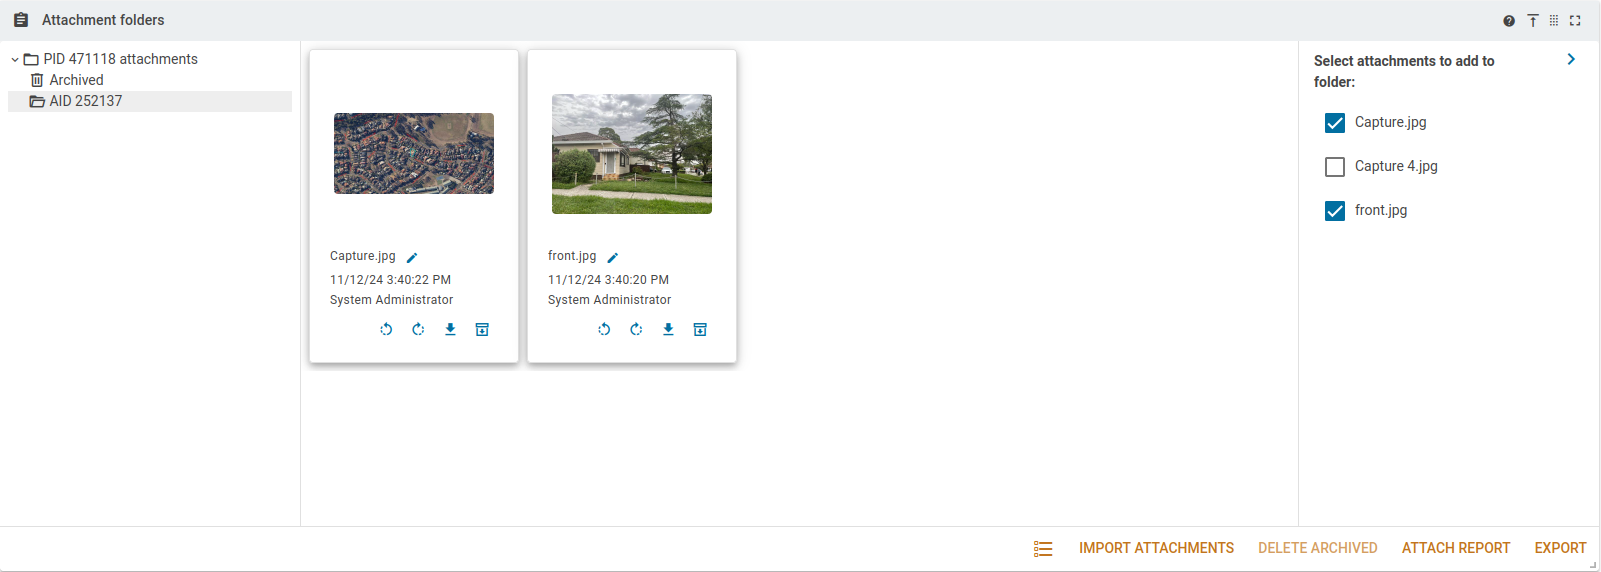
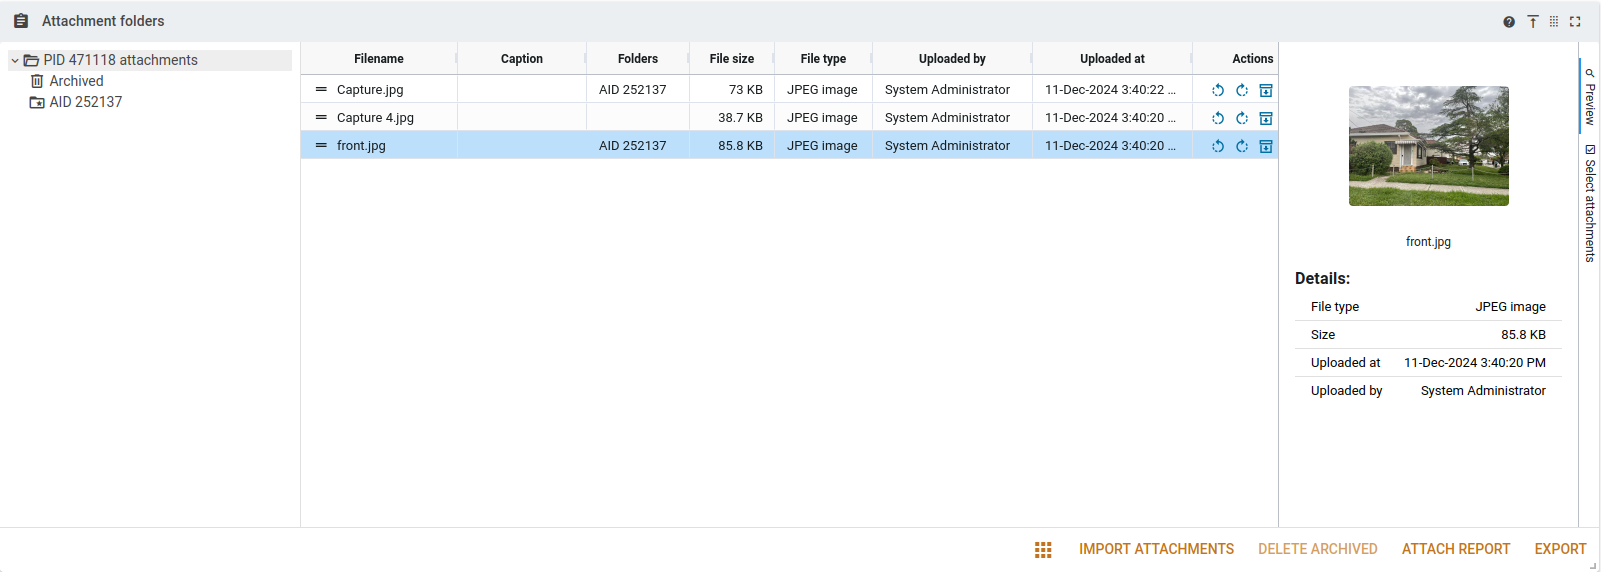
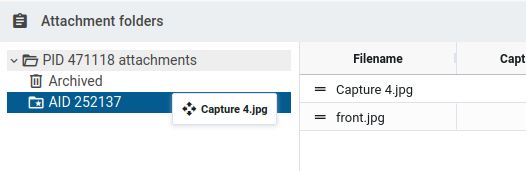
Attachment folders
The Attachment folders panel provides a tree view of attachments associated with the property. Attachments are split into folders based on the corresponding analyses, worksheets and properties. They are displayed in order of attachment date and time to start with, but if you rearrange them the order will be retained. Order is saved per-folder. Ensure that any changes to order are made in all required folders, not just one.
Folders are presented in a tree on the left side of the panel. The currently selected folder is highlighted in grey. Folders can be switched by clicking on the desired folder's name in the tree.
The panel can be switched between grid view and tile view.
Tile view
Tile view is very similar to the existing attachments panel, with all attachments within a folder laid out as preview tiles.
Grid view
Grid view presents the attachments as a table of values. Attachments can be rearranged by dragging the triple bar icon in grid view, or by dragging the tiles around in tile view.
To copy attachments to different folders (e.g. from the property to an analysis), the rows in grid view can be dragged and dropped onto the folders in the tree on the left. Dropping rows onto these folders will copy attachments, unless dropped onto the Archived folder, which will remove them from all folders and move them to the archive. Multiple rows can be selected by shift-clicking them. Dragging any of the selected rows will copy all of the selected attachments in one move.
In the grid view, a preview tab is present on the right side. When a single row is selected, this tab will present information about the corresponding attachment, as well as a preview. The tile view does not have this preview tab.
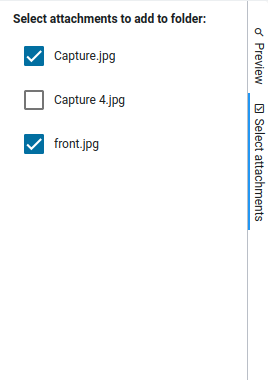
When in either view, attachments can be quickly added to a folder using the Select attachments tab. This tab provides a checkbox list of all attachments on the property. Checking the corresponding box will copy the attachment into the currently selected folder. Unchecking will remove it. This list is not available in the Archived or property folders.
You can add attachments to a property by dragging and dropping them on to the page, or by clicking the Upload attachments button. Then click Add files… in the popup. Note that attachments are only added to the default folder (denoted by a starred folder on the left) and the property folder. Further arrangement should be handled using the folder view itself.
When in a folder, you can archive any attachments by clicking the Archive ![]() button. This will move them to the Archived folder. When in the archive folder, you can delete any attachments using the Remove . Alternatively, archived attachments can be moved back to the property folder using the Unarchive
button. This will move them to the Archived folder. When in the archive folder, you can delete any attachments using the Remove . Alternatively, archived attachments can be moved back to the property folder using the Unarchive ![]() button. If desired, all archived attachments can be deleted using the Delete archived button. The system will ask you if you’re sure you want to do this, because deleting the attachment will remove it from any analyses, supps and/or worksheets.
button. If desired, all archived attachments can be deleted using the Delete archived button. The system will ask you if you’re sure you want to do this, because deleting the attachment will remove it from any analyses, supps and/or worksheets.
ANYTHING YOU DO WITH ITEMS IN THIS PANEL WILL BE RECORDED ON THE SERVER IMMEDIATELY.
You don’t have to click the Update button in order to have these changes become permanent.
This panel is intended to be used instead of the Attachments panel. Simultaneous use of both panels may have unpredictable effects. Please only use one or the other at a time.
Worksheet calculations (main)
You can add extra items to the calculations table by clicking in the first empty column of the table, and entering a description. You can then enter a quantity of what you’re measuring, the units you’re measuring and a rate per unit. If possible, the popup will calculate the value for you. Alternatively, you can just enter the value.
Make Calcs
This button allows you to create worksheet calculations for the selected properties. It will show this popup:
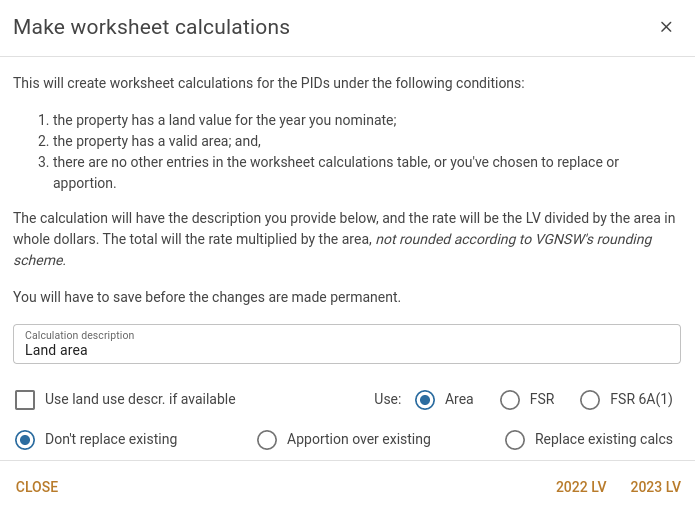
You can replace "Land area" with any text you deem appropriate. Alternatively, you can tick the box to indicate to the system that it should use the description from the worksheet's land use code instead.
Without changing any of the options, the system will make a calculation line by dividing the nominated land value by the land area, and making that calculation the only calculation line in the worksheet's main calculation table. If there is already a calculation line there, by default, the system won't replace it.
There are a few options available to you. You can choose to have the system make the calculation based on the existing worksheet FSR, or the worksheet's 6A(1) (permissible) FSR instead of the area.
If you choose to apportion over the existing calculations, the system will alter the existing calculation rates so that the total values in the table retain their proportions, but add up to the nominated value.
If you choose to replace the existing calculations, the system will delete the existing calculations and then proceed as if previous calculations never existed.
You will have to save the property before the changes are made permanent.
Import Future Year Attributes
This button will copy the attributes from the future year tab (if any exist) and convert them to worksheet calculations.
Import Current Year Attributes
This button will copy the attributes from the LT year tab (if any exist) and convert them to worksheet calculations.
Apply to Future LV
This button will take the total of the worksheet calculations and apply this value to the the future LV.
Apply to Current LV
This button will take the total of the worksheet calculations and apply this value to the the corrected LV of the LT year.
Copy
This button will copy the worksheet calculation rows in a format suitable for pasting into a spreadsheet.
Worksheet calculations (other)
In the case where you're required to maintain alternate calculations (like different rates for heritage properties), you can put these calculations into the alternate calculations table.
In the case where you have a section 28 property split across two LGAs, you can enter calculations for the land use, and separate calculations for the LGA apportionment. The section 28 tables won't be visible unless the property has a valuation basis containing "28".
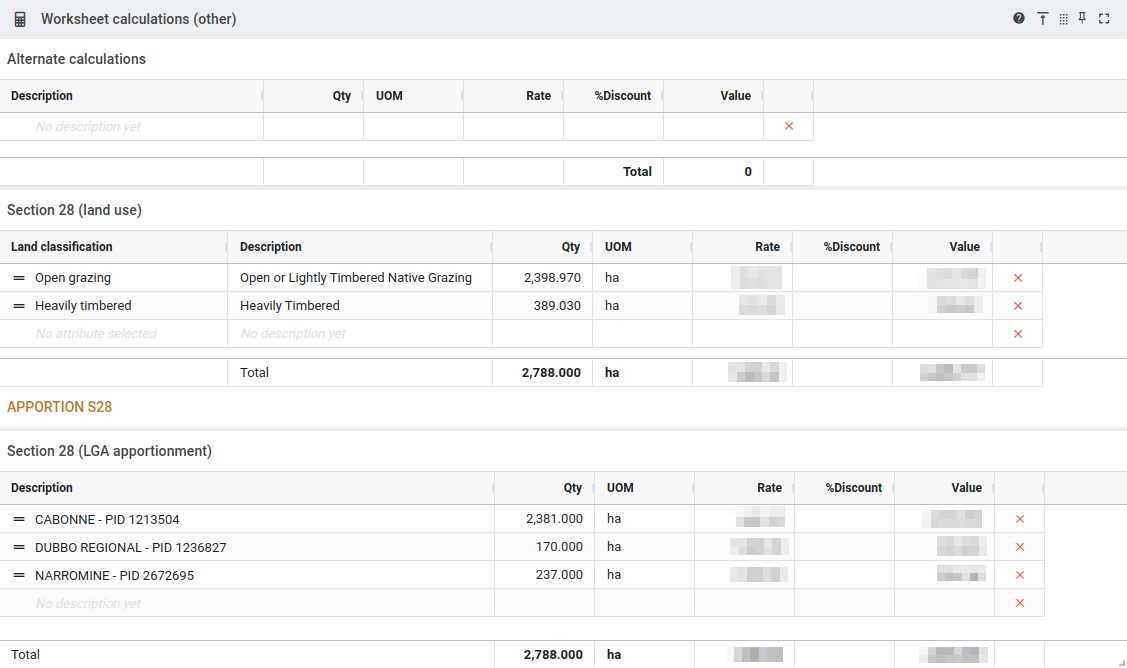
The Apportion S28 is button not available when you're editing supps. This is because the supps for S28 properties will come in different workflows. You should make a note and come back to do the apportionment when the supp is complete and all properties exist on the valuation roll.
Worksheet notes
You can select the valuer responsible for this worksheet, a land use code, worksheet stage and indicate whether the property is improved.
You can enter comments for the following items:
| Section | Notes |
|---|---|
| Improvements | you must provide commentary here if the land value basis code is 6A(2), 14G or 26A. |
| Other information | for information that doesn't fit any of the other categories. |
| Licence/lease | there is also a field beneath this comment into which you can put the licence / lease area. |
| Zoning | include information about development or planning controls. |
| H&B (highest & best) use - existing improvements | you must provide commentary here if the land value basis code is 6A(2). |
| H&B (highest & best) use - permissible | |
| Heritage (state) | provide information here if there is a heritage allowance. |
| Environmental constraints | |
| Valuation rationale | |
| Floorspace ratio | |
| Onsite rationale | you must provide commentary here if there is a corresponding allowance. |
| Offsite rationale | you must provide commentary here if there is a corresponding allowance. |
| Subdividers rationale | you must provide commentary here if there is a corresponding allowance. |
| MDAF rationale | you must provide commentary here if there is a corresponding allowance. |
| MUAF rationale | you must provide commentary here if there is a corresponding allowance. |
| Stratum rationale | you must provide commentary here if there is a corresponding allowance. |
| Unutilised rationale | you must provide commentary here if there is a corresponding allowance. |
| Attributable part rationale | you must provide commentary here if there is a corresponding allowance. |
| Coal rationale | you must provide commentary here if there is a corresponding allowance. |
These items will be pre-populated with the text you specify in the Contractor | Options page.
Worksheet PDFs & snapshots
The Worksheet PDFs panel contains a list of all the worksheets you've generated for this property. They are displayed in reverse base date order.
You can attach a new worksheet by clicking the Attach Worksheets PDF button, and can attach previous year worksheets by clicking the  button.
Related properties
You can set up relationships between properties that are part of either a 26A group or a section 28 group.
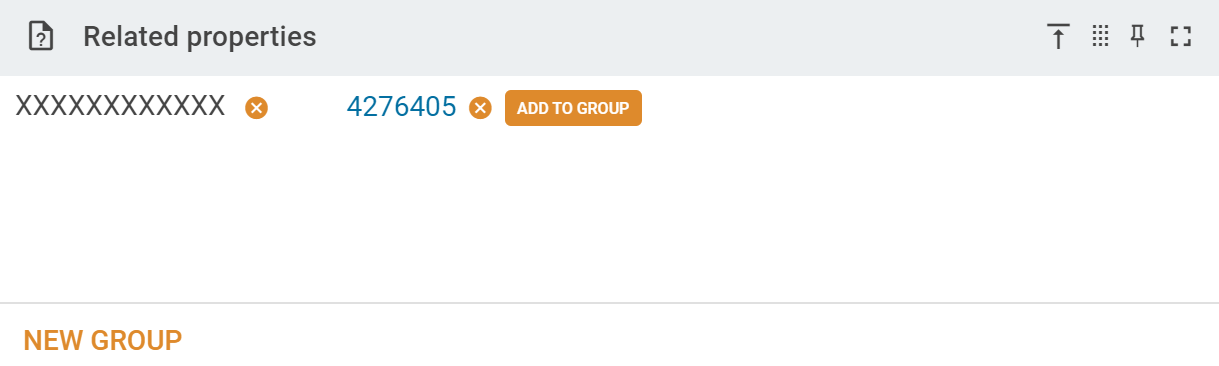
If you want to add the current PID to a new or existing group, you can click the ADD TO GROUP badge. This will show a popup like to following:
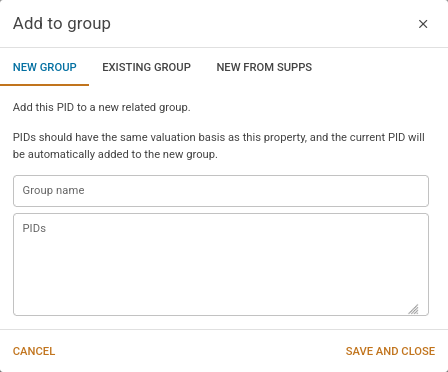
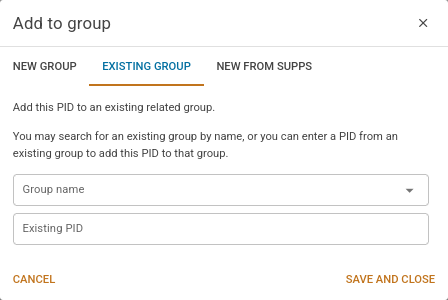
This popup has three tabs, New group, Existing group and New from supps. For supps, the default tab is New from supps. This tab presents a group editor, with various information pre-filled from the supps, if it is available. This editor includes the following panels:
- S26A group detail
- S26A children
- Related group info
- Section 28 (land use)
- Section 28 (LGA apportionment)

The other two groups function the same as in the property editor. New group allows you to specify a name and set of PIDs for a new group. The current PID is automatically included in the new group, even if you don't write it in the text area. In the Existing group tab, you can either select a group from the autocomplete dropdown, or you can enter a PID in an existing group to add the current PID to that same group.
Any PID you mention in the group will show the group information in its own Related properties panel.
Valuation rationale / exceptions
You can enter commentary in this field when you want to keep notes of why you chose a particular value for a property. This information will be available behind the Info  button.
If you enter a land value outside of the range specified by the Exceptional factor lower and upper cut off values in the Contractor options, you will see a pop up that prompts you to record the reasoning behind the exceptional value.
Activities
Click the New button to add a new activity description.
You can enter information in the description field, and then choose whether this information will be included when a worksheet PDF is generated.
Click OK to record the activity.
You don't have to click the page's main Save button to keep these changes: they're immediately saved to the server.
Activities associated with the property will be displayed in the list. Click the Edit button on the right to edit the activity; click the Remove button on the right to delete it.
Leases
You can add information about commercial leases, and it will be passed on to VNSW in the market data file. To add a new lease, click the New button and then complete the New lease form.
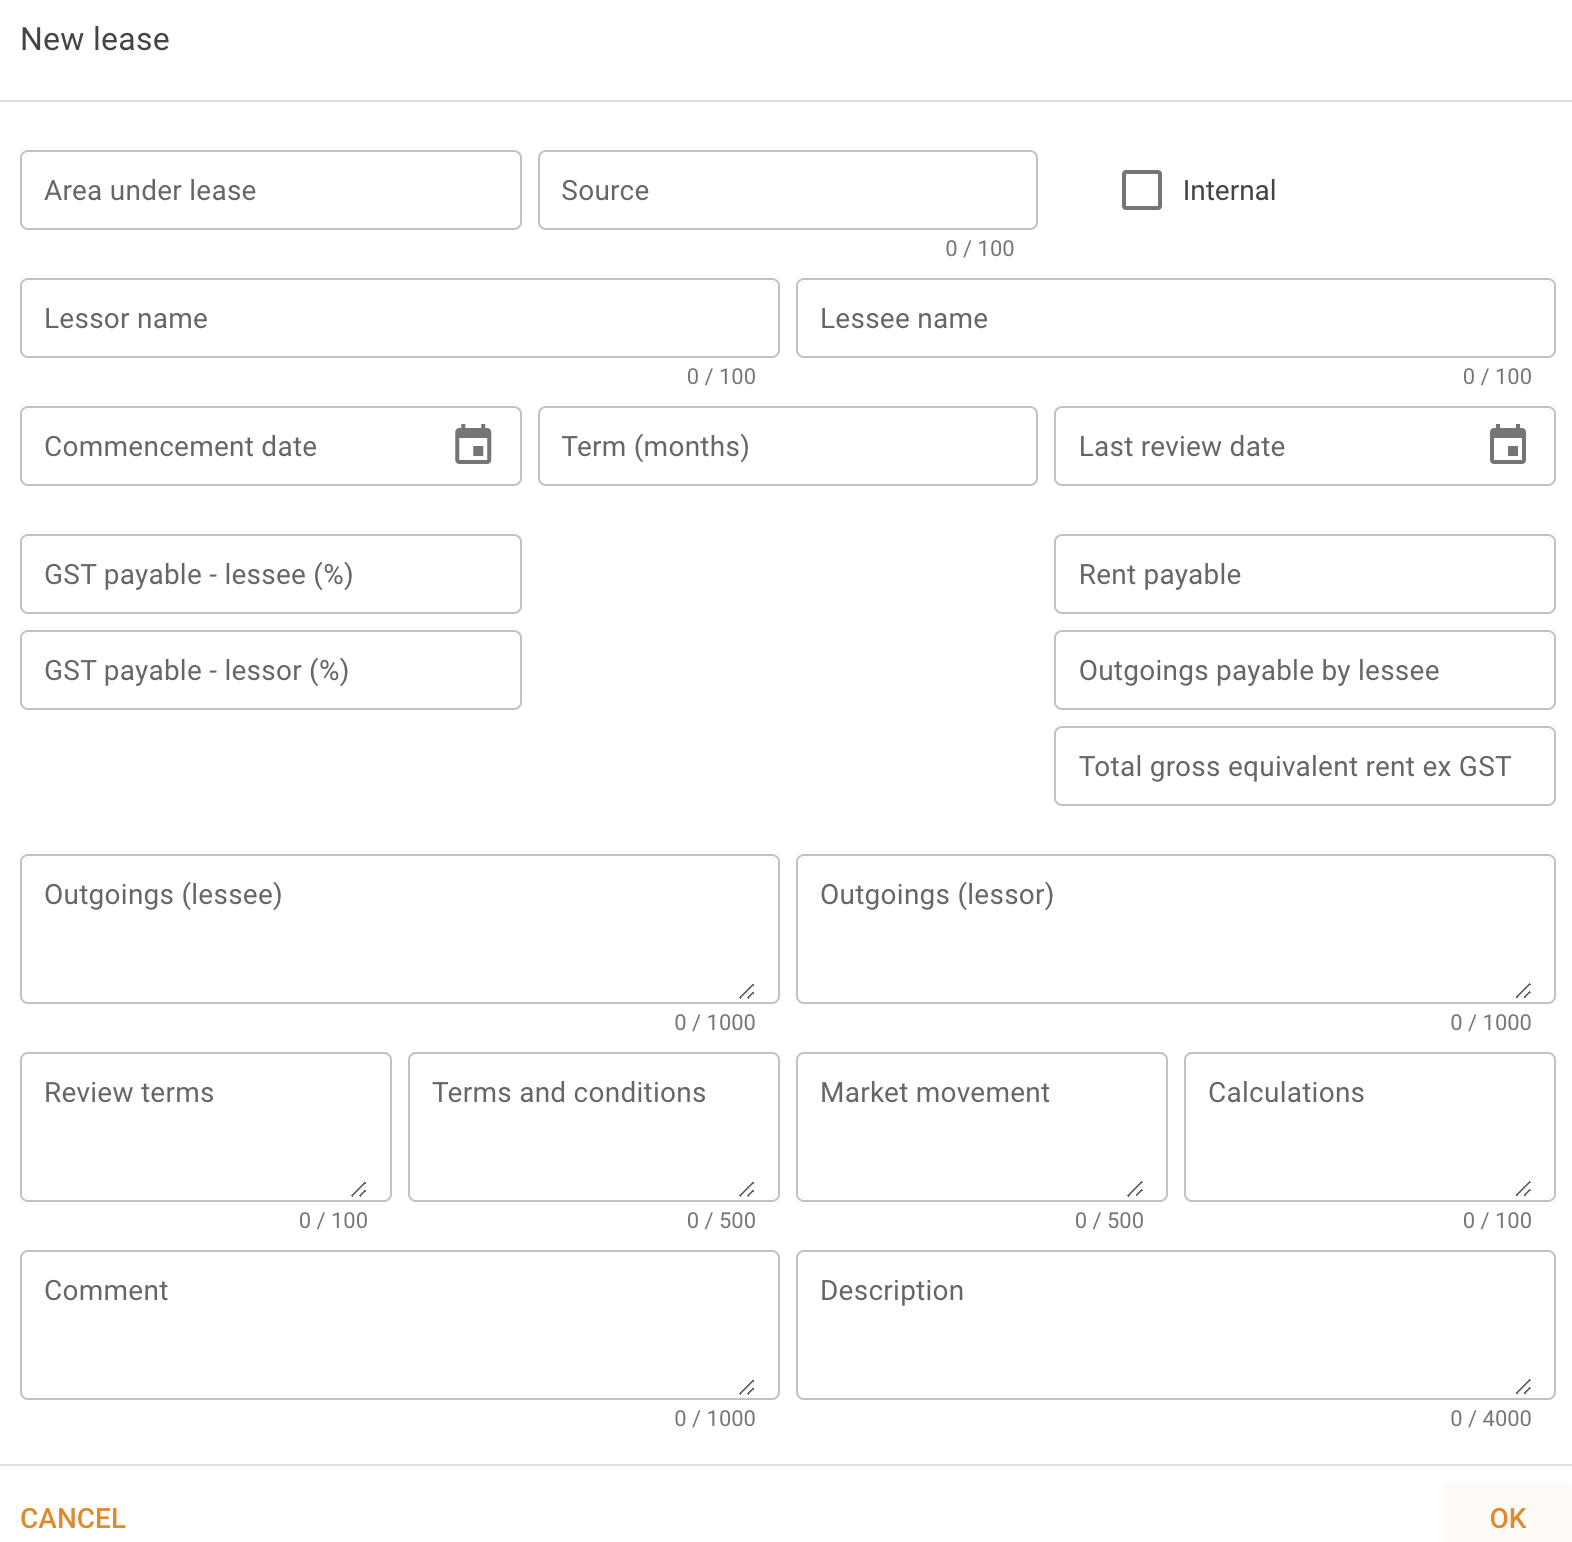
Fill out this form and click OK to save the lease information.
You don't have to click the page's main Update button to keep these changes: they're immediately saved to the server.
Leases associated with the property will be displayed in the list. Click the Edit button on the right to edit the lease; click the Remove button on the right to delete it.
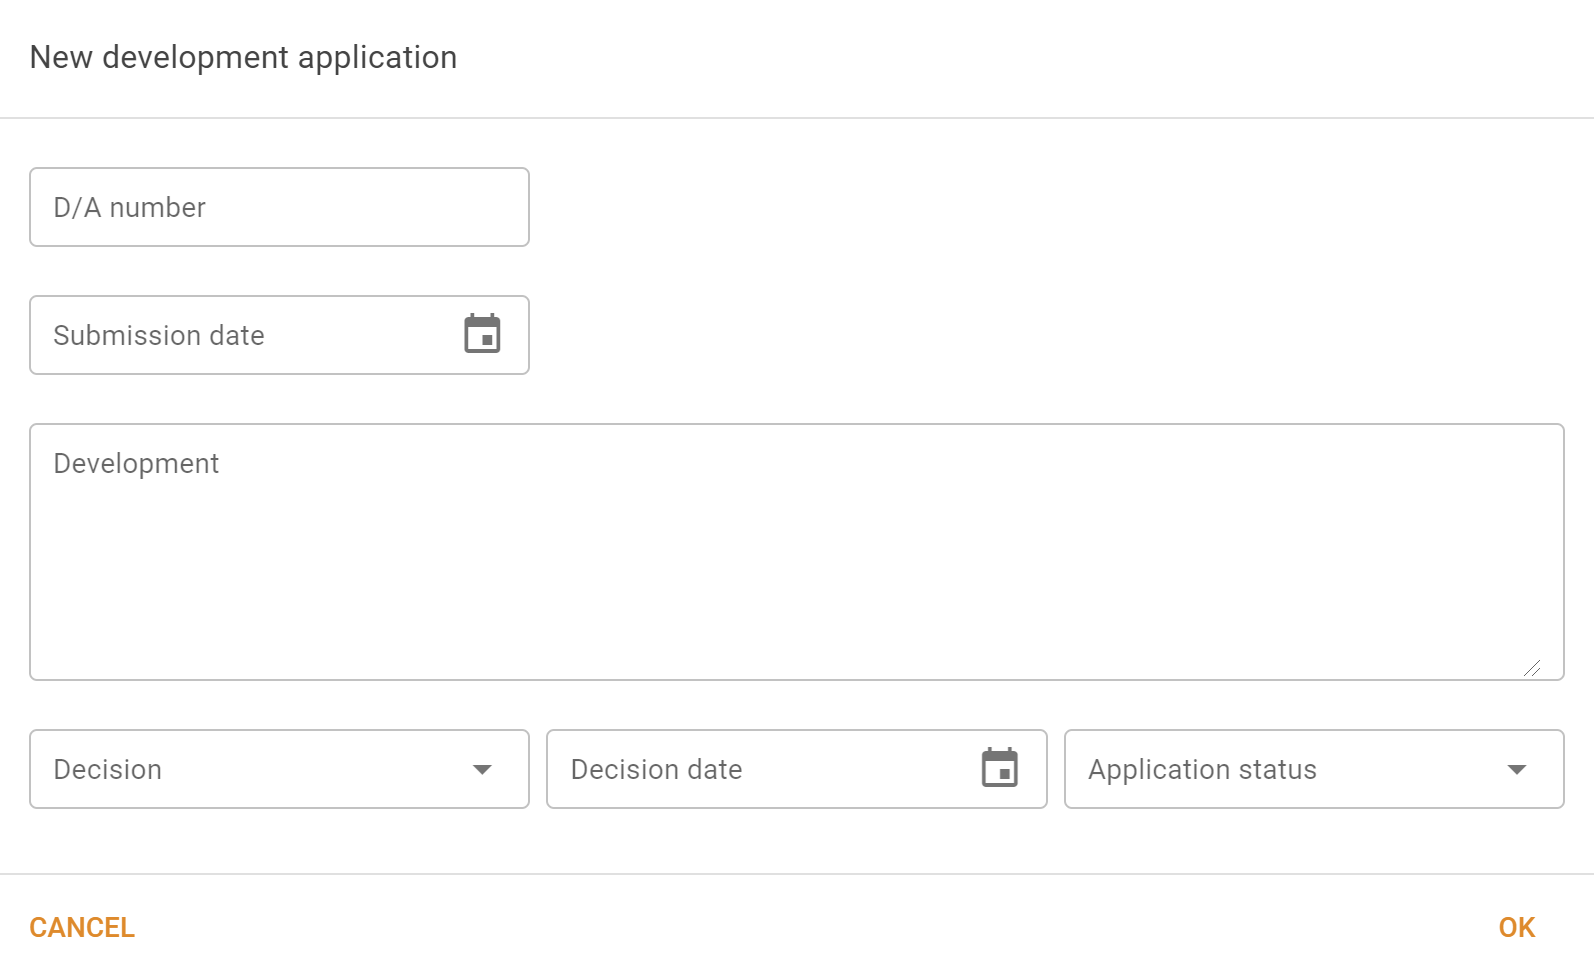
Development applications
If the property has any development applications associated with it, they will be listed in this table.
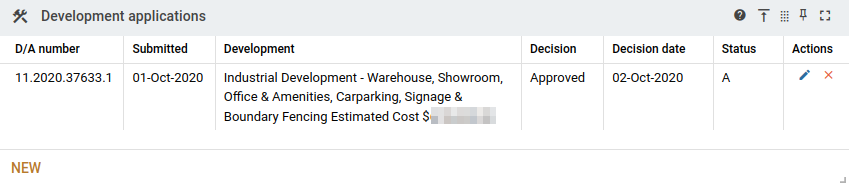
DAs associated with the property will be displayed in the list. Click the Edit button on the right to edit the lease; click the Remove button on the right to delete it.
You can create new DAs to associate with the property by clicking the NEW button. Fill out the information in the popup in order to include the information in the table.
S26A group detail
If the property or supp is part of an S26A related group, this panel allows you to edit parent-level information about the group. Any field that you specify here is shared between all of the PIDs in the related group.
For the related group, you can set the following fields:
- S26A PIDs
- Source of development details
- Underlying site area
For several years up to the future base year, you can also set various values. These values relate to the selected year, and can be modified on a per-year basis, rather than per-group as with the fields above. The following fields are editable:
- Permitted FSR
- Achieved GFA
- Last updated date (defaults to the current date on group creation)
Additionally, the following fields are computed automatically for each year, most based on edited values above:
- Updated by
- Achieved FSR
- Permitted FSA
The S26A PIDs text area allows you to enter a comma or whitespace separated list of PIDs to add to the related group. If you've set the group type, the PIDs must have the same valuation basis as the current related group. If they don't, they'll be automatically removed and you'll see an error message.
Below the FSR/GFA fields above is a calculations table. These calculations are set per-year, and apply to the underlying site, rather than the individual PIDs. As with the standard worksheet calculations, you can copy and paste in this table and the total automatically calculates and displays in the bottom row.
If the related group's type is not S26A, then this panel will instead display the message: Form unavailable for non-S26A groups.

S26A rentals
This panel shows calculations for the PIDs in a section 26A related group. Each PID has its own tab. When a tab is selected, you can adjust the calculations for the corresponding PID. Calculations are set per-year, which can be selected with the tabs. Calculations from the most recent prior year are automatically brought forward when a new year is activated.
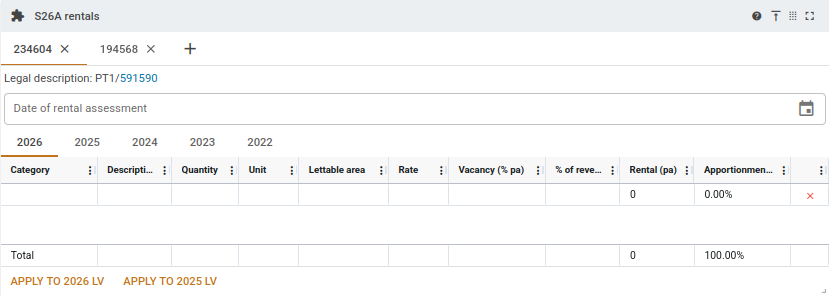
If the related group's type is not S26A, then this panel will instead display the message: Tabs unavailable for non-S26A groups.
Changes made to the PIDs or calculations in this table are not persistent until the editor's Save button is pressed.
To add new PIDs to the related group, you can press the New tab  button. This will open a dialog allowing you to enter a PID. You can only add a new PID if it has a section 26A valuation basis. To remove a PID from the related group, the Delete button on the corresponding tab can be clicked. This will remove the PID and its calculations from the group.
The calculations table will automatically calculate the apportionment percentage and the total annual rental for each row in the table. The apportionment percentage is the percentage for each row with respect to the total for the related group. The bottom row also holds totals for the current PID tab's calculations.
The annual rental is calculated differently depending on the category for each row. The calculations for each category are as follows:
- Residential & Parking = Quantity x Rate x 52
- Commercial = Lettable area x Rate
- Accommodation = Quantity x Rate x 365 x (100 - Vacancy %)
- Other = Quantity x Rate
For each tab, the panel shows the PID's legal description, with each of any plan numbers clickable as a link. These plan number links will open property search results for properties with the same plan number.
Additionally, the panel provides an editable date field for the rental assessment of each PID. This date field is per-PID, and can be used to record when changes to the rental apportionments are made.
$1 apportionments
In some circumstances, an apportionment should be given a $1 (one dollar) value. To make this happen here, add a description, then enter a 1 into the Rate column. Don't enter anything else in any other numerical column. While the total of the row will be zero, you'll find that the apportionment will be given a $1 value in the summary.
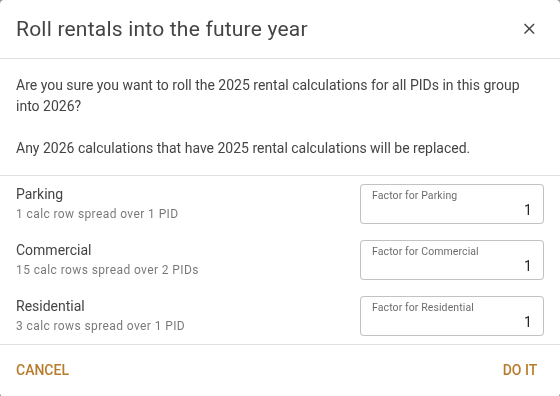
Roll [LT YEAR] into [FUT YEAR]
Click this button to roll the rates from the LT year into the future year tab. The system will show up a popup that will allow you to specify the factor to apply to each category. When you click Do it, these factors will be applied to all rows for each PID in the group.
S26A assessment summary
This panel provides a read-only overview of the apportionment values for each of the PIDs in a section 26A related group. Each row includes a PID, the legal description, the rental percentage with respect to the related group, and the apportioned value of the PID for the selected year. Years can be selected with the tabs at the top, and the apportionment percentages will calculate based on that years' rental calculations and total value.
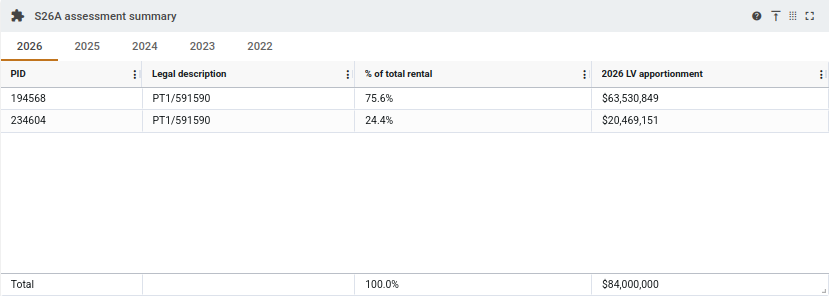
If the related group's type is not S26A, then this panel will instead display the message: Table unavailable for non-S26A groups.
Apply to [YEAR] LV
Pressing these buttons will apply the values in the LV apportionment column to the corresponding PIDs. If the value is applied to the LT year, it will be as a verification and the value will be added as a corrected LV. If the value is applied to the future year, the value will be set and the valuation methodology will be REGRADED. The 1-SEC26A risk rating will be applied to the future value.
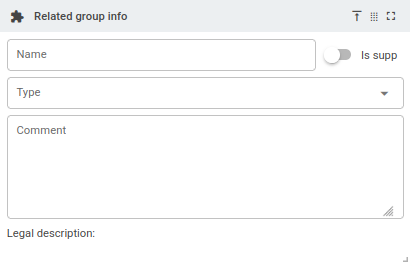
Related group info
If the property or supp has at least one related group, this panel will display and allow you to edit certain information. This includes the group's name, type, whether it is a supp, and provide an associated comment.
The legal descriptions for all of the PIDs in the related group will be combined and displayed below the comment text area.
Section 28 (land use)
This panel is equivalent to the existing Section 28 (land use) table in the Worksheet calculations (other) panel. Here, you can enter calculations for the land use. Further information is available in the Worksheet calculations (other) section above.
If the property or supp you are editing doesn't have a section 28 valuation basis, this panel will instead show the message Calculation table unavailable for non-S28 groups.
Section 28 (LGA apportionment)
This panel is equivalent to the existing Section 28 (LGA apportionment) table in the Worksheet calculations (other) panel. Here, you can enter calculations for the LGA apportionment. Further information is available in the Worksheet calculations (other) section above.
If the property or supp you are editing doesn't have a section 28 valuation basis, this panel will instead show the message Calculation table unavailable for non-S28 groups.