Appearance
Working with search results
Once you’ve searched for Property, Supp, Analysis or Sale, you will have a table showing all the items that match your search criteria within the results you have access to.
You won’t see any search results for areas outside of the ones your system administrator has granted you access to. If you’re not seeing results you think you should, you might want to have a chat with your system administrator.
Search results allow you to
- Further refine the set of search results
- Manage the display of search results
- Work with search result items
Refining search results
Sometimes, you will be able to eye-ball a set of search results and realise that they’ve returned everything you were looking for. Other times, you will see that they’ve returned everything you’re looking for plus some extra records you might not have been expecting or wanting.
Let’s look at the search results for the criterion matching the Street name of murray.
We see results for MURRAY ST (which is what we were expecting). But we also see results for:
- MURRAY LANE
- MURRAY GR
- MCMURRAYS RD
- MURRAY RIVER LICENSES
- MURRAY HUT DR
When we see all the extra items, we could do one of two things:
- We could go back to our search criteria and insert a more specific query, or
- We could refine the result set within the current search results
There are a couple of ways to refine this set. We could use:
- Manual selection
- Filtering
Let’s see how to do each in turn.
Manual selection
When you have run a general query and you can see a subset of results that you’re looking for, you can directly select those items.
To select one item
- Click a row. The row background turns blue.
To select multiple items
- Click, hold and drag across multiple rows. Selected rows turn blue.
The blue-coloured row indicates that the item is selected. You can choose to add more rows to the selection.
To add a row to the selection
- Hold down the CONTROL key on your keyboard, and click the row.
To add multiple rows to the selection
- Hold down the CONTROL key on your keyboard, and click, hold and drag across multiple rows.
OR
- Move your mouse to an item several rows away from your most recent selection.
- Hold down the SHIFT key on your keyboard, then click the row. All the rows between the two clicks are selected.
You can continue alternating between CONTROL + click-drag, CONTROL + click and SHIFT + click to continue adding rows and ranges to the selection.
Filtering
Filtering can help us refine a general search query into a more specific one.
To filter a result set, we can enter filtering information into the filter row of one or more columns.
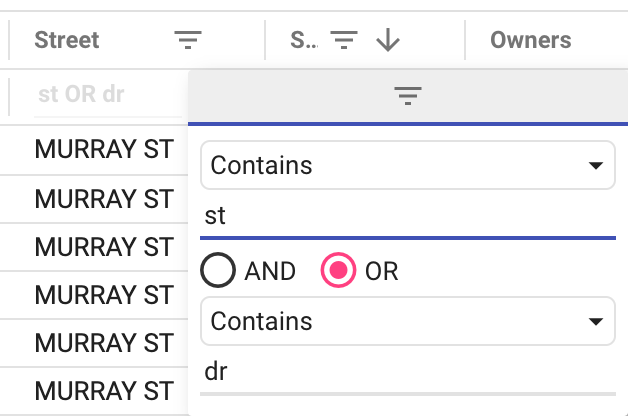
Entering st into the filter of the Street name field filters out all the non-street results.
We can also filter using multiple criteria. We do this by inserting more than one filter criteria.
Entering st into the Street name filter and finley into the Suburb filter filters out all the non-street results outside of the suburb of Finley.
We can also filter using multiple criteria in a single column by pressing the column’s Filter  button.
Filtering is only temporary though. Filters aren’t retained through a query refresh. To make our set persist throughout an extended session, we will want to select all the remaining rows and then “hide” rows that are not selected.
Hiding and showing rows
Having refined the result set, it is useful to hide all the rows you haven’t selected.
To hide non-selected rows
- Choose SELECT menu | All rows (Alt + A).
- Choose SELECT menu | Hide non-selected rows.
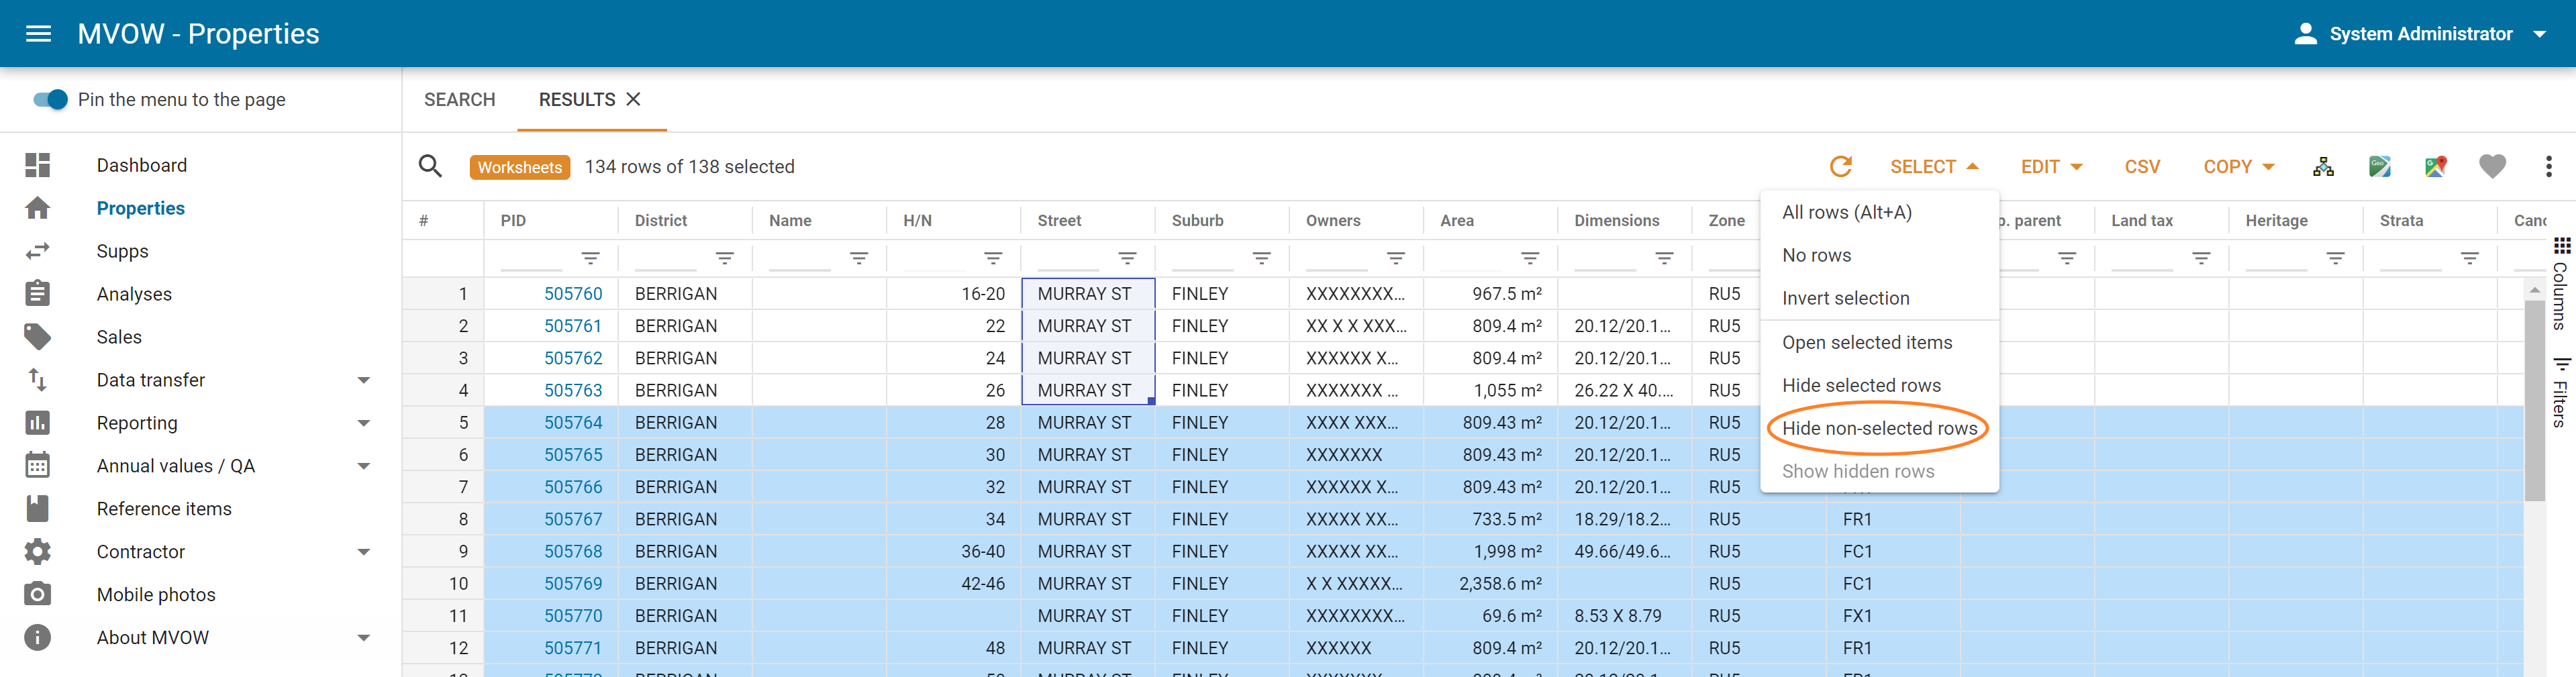
When rows are hidden, the number of hidden rows are shown at the top of the result set.
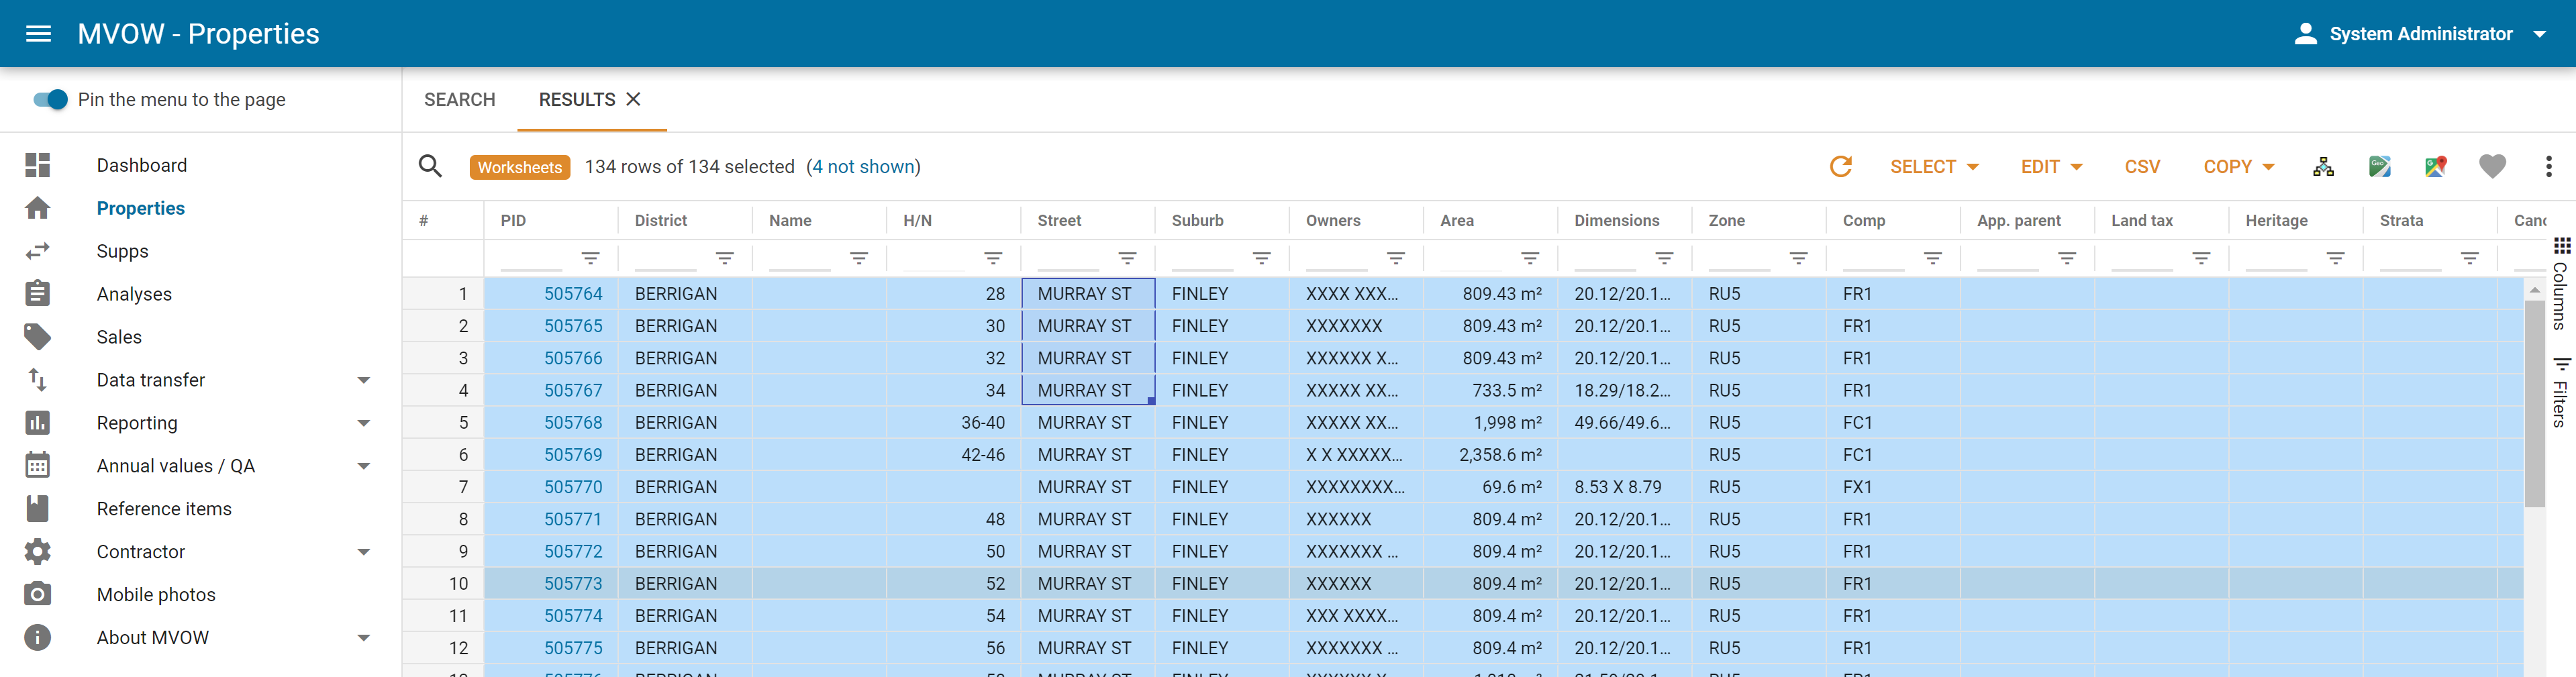
You can hide selected or non-selected rows multiple times. Each time you hide another set of rows, the number of hidden rows grow.
When you want to see the hidden rows, you need to show them again.
To show hidden rows:
- Choose SELECT menu | Show hidden rows, or
- Click the link (e.g. 4 not shown in the above image).
Managing the display of search result columns
Search results appear with a great number of columns. You can see all the columns by scrolling the grid side-to-side. Sometimes, however, it is easier to change the way the columns are displayed than to scroll side-to-side.
Rearranging columns
You can change the order of a column by dragging the column label to a different position.
Hiding columns
- Click on the Columns button.
- Untick any column you want hidden.
When you have organised your columns as you like it, you may want to save your changes. You do this using column profiles.
Saving a column profile
- Choose Action
 | Save column profile as…
 - Name the profile and press Save.
Switching between column profiles
- Choose Action | Column profiles, then
- From the list of column profiles, choose the one you want to see.
Switching a column profile to default columns
- Choose Action | Reset current column profile.
Editing search result items
Now we’re ready to begin working with the items in the search result grid. There are multiple ways to update the data contained in the search result items:
- Opening an item
- Editing items in-place
- Selecting items for bulk editing
Opening an item
You can open any item to edit it.
To open an item:
- Double-click the item. The update page appears in a separate browser tab.
OR
- Click the item to select it, then choose SELECT menu | Open selected items. The update page is displayed in a new browser tab.
To learn how to use update pages, See Updating items.
Editing items in-place
You can edit some cells or columns within the search results grid.
To edit cells inline:
- Choose EDIT menu | In grid.
- Columns shaded white are editable within the grid. Columns shaded grey are uneditable.
- Change the value of the cell and press Enter. The cell updates to the new content.
You can drag the updated value to other cells in the results. Click and drag the fill handle (the little blue box in the bottom-right of the cell) to other cells in the column.
- When you’re finished editing, press the SAVE IN-PLACE CHANGES button.
- Switch off in-place editing by choosing EDIT menu | Stop editing.
When you double-click on a column that isn’t editable inline, the system opens the update page for the selected item. Any legal updates can be made there.
Selecting items for bulk editing
If you want to edit more than a single attribute across a range of items, you can bulk edit the items.
To bulk edit selected records:
- Select a range of items from the search results.
- Choose EDIT menu | With bulk editor . The bulk editor appears.
- Make your changes. Remember to Save then choose EDIT | Stop editing .
To learn how to use the bulk editing page, see Making bulk edits.
Exporting to a spreadsheet
Select any items you want to view a spreadsheet and press the CSV button.
Pressing CSV without a selection will export all items in the result set that are not hidden.
Viewing in properties in ValMap
Select any item you want to view in ValMap, then choose the ValMap  or ValMap portal
  buttons.
Pressing ValMap or ValMap portal without a selection will export all items in the result set that are not hidden.
Viewing properties in MVOW mapping
Select one or more items in the search results and click the MVOW mapping  button. MVOW mapping will open in a new browser tab zoomed into an appropriate level with the selected properties highlighted.
Instead of opening maps in a new tab, you can use the mapping panel to provide a real-time map for properties in the search results. By default, no properties are shown in the mapping panel. When you select properties in the search results, the map will focus on them, and highlight their borders. When you select them in the map, they will also be selected in the search results. If you select new properties, the search results will also add or replace the properties depending on the Toggle replace  button's state.
The mapping panel remembers its size and selected options, and will reuse these in subsequent search results.
Primary toolbar
The primary toolbar in the mapping panel differs from the normal map, introducing two new buttons and removing the MVOW search  button. The other icons are equivalent to their standard map versions. See On-map controls for more information.
| Button | Description |
|---|---|
Control panel  | Shows the control panel in a popup dialog. This control panel is equivalent to the standard map's control panel. See Control panel for more information. |
Toggle replace  | Toggles whether selections in the map replace, or add to the entries in the search results. Defaults to adding selection to the results. The icon switches to indicate the current state. |
Viewing properties in Google Maps
Select one or more items in the search results and press Google Maps  button menu | View in Google Maps
  .
.
Google Maps will open in a separate browser tab.
Route planning in Google Maps
Route planning will assist you in choosing shortest or quickest route from your planned starting point through each selected property.
To plan a route
- Select one or more items in the search results and press Google Maps button menu |
 .
.- The Route finder dialog will open.
- In the Route start point field, enter the address from which you will start your route (e.g. your office address).
- From the Last property on route list, select the property you wish to visit at the end of your route.
- Select either Travel time or Distance as your travel minimisation method.
- Press Plot route. Google Maps will open in a separate browser tab.
Your system needs to be configured with your own Google API key to use route planning. If your system does not have an API key, talk to your system administrator about configuring it.
Making a search favourite
When you know you will use a search again, you can make it a favourite by clicking the Favourite  button (next to the Action menu). When selected, it will show as a red Favourite
  .
.